Behringer X32 Producer: Difference between revisions
(→Basics) |
mNo edit summary |
||
| (3 intermediate revisions by one other user not shown) | |||
| Line 19: | Line 19: | ||
===FX=== | ===FX=== | ||
The X32 also has an internal effects generator, which we kind of don't use but probably should. There's a bunch of decent effects, mainly reverb and delays that would be good for music performances. Or for messing with people when they're listening to the feedback. Your choice. | The X32 also has an internal effects generator, which we kind of don't use but probably should. There's a bunch of decent effects, mainly reverb and delays that would be good for music performances. Or for messing with people when they're listening to the feedback. Your choice. | ||
===Groups=== | |||
Both the Producer and the Compact come with the ability to group multiple channels together for ease of use. To group channels; | |||
* Press the groups button on the layers listed buttons on the right side of the board. | |||
* Select the group (1-8) and press and hold the select button (button will light green) | |||
* Press the required input faders (this can be across multiple layers) select buttons | |||
This allows for multiple feeds to be represented by 1 fader, making setups with multiple microphones which have to come on at the same time or go off at the same time simpler to manage. However, this only applies when the output feed can be at a uniform gain irrespective of the input volume gain. This makes it better for use when the group of sources is going to have roughly the same volume and levels throughout. | |||
===Busses=== | |||
Using the same principle, a number of feeds can be represented on a single bus fader which is then sent to the output mix using sends on fader. They vary from groups in that they can output a varying grain mix, so the main output levels for the grouped signals can be different to the output of the bus. This allows for the bus to send a signal to a stage box or other monitor at a different level across the mix compared to the main LR output of the board. | |||
===Useful=== | |||
* Scenes can be saved of the current setup of the board which includes levels and EQ settings. We keep a few scenes in the repository as basics that can start off a new operator at the start of setup. These are just simple level and EQ assumptions for studio and OB setups. 3 are also in for the internal sound system ([[Control Room audio|Control room PC audio system]]). The presets will bring up both of the edit desks to playout through either the control room, studio or both. | |||
* Feel free to use these scenes and to create more for OBs and shows that are likely to be repeated. Just don't overwrite any of them unless you know they're not being used. | |||
* The Producer (and the [[Behringer X32 Compact|Compact]] for that matter) both have USB slots on the top near the screen which allow for the offloading or re-loading of scenes for the purpose of backup. | |||
* Scenes will keep the bus and groups in them, so any short cuts programmed in will be reflected in the loaded scene. | |||
* '''NAME YOUR SCENES''' | |||
* Finish your scene before you save and walk away, anything changed after hitting save won't be saved and you'll have to save over the top of it. | |||
* For a large show, like Roses, it is recommended to have multiple copies of the show on USB drives and the board to avoid accidental deletion and alterations. Just don't lose the stick. | |||
* '''For more information''' see the user manual [https://media63.musictribe.com/media/PLM/data/docs/P0AWQ/X32-PRODUCER_M_EN.pdf here] | |||
[[Category:Equipment]] | |||
[[Category:Audio]] | |||
Latest revision as of 08:56, 23 July 2021
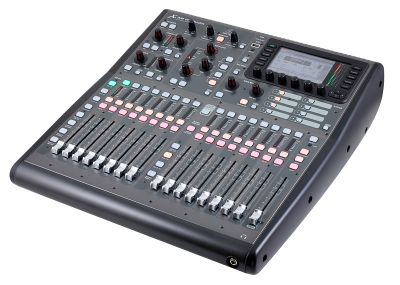
The x32 Producer was the first large digital sound board that we bought back in 2015 / 16. Designed to replace the Allen and Heath which was really just too enormous to take to quick, low impact OBs like sports. Also, being digital it allows a great deal of automation and program-ability. It has since accompanied us to almost every OB in the last year 2018 / 2019. Also, being a Behringer it opens up access to the Behringer ultranet system, and communication between multiple x32 boards over AES50.
Basics
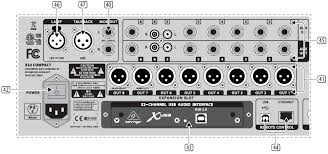
The input controls are on the left side of the board and consist of several layers of channels in groups of 8. The board (as it's name should suggest) has 32 channels of audio input, 16 of them are physical XLR inputs (on the back of the board) which are represented by 2 layers of the input side. note here our layer 1 (inputs 1-8) don't have phantom power after a botched repair at Behringer.
The remaining 16 channels can be assigned as stage boxes via AES50 or from another Behringer board. The other layers are for AUX channels and effects returns.
The outputs and mix busses are on the right side of the board, again arranged in the same layered way and with the master fader to their right. Above the inputs is the EQ section, where the input signals can be adjusted, gates and compressors can be put on and phantom power assigned. see the microphone information page for when and where to use phantom power.
Above the output fader bank is the screen, where all the internal control of the desk can be operated. The routing and the visual display of the EQ can also be seen on the screen. note the screen is also a bit damaged after the Behringer 'fix'. All of the buttons on the left side actually perform the actions of the right side and vice versa.
The studio outputs are a bit different to normal OB outputs since the output passes through 2 independent amps 1 for the control room and one for the studio. For a stream, we would normally use an LR XLR pair out into the ATEM through it's breakout cable.
FX
The X32 also has an internal effects generator, which we kind of don't use but probably should. There's a bunch of decent effects, mainly reverb and delays that would be good for music performances. Or for messing with people when they're listening to the feedback. Your choice.
Groups
Both the Producer and the Compact come with the ability to group multiple channels together for ease of use. To group channels;
- Press the groups button on the layers listed buttons on the right side of the board.
- Select the group (1-8) and press and hold the select button (button will light green)
- Press the required input faders (this can be across multiple layers) select buttons
This allows for multiple feeds to be represented by 1 fader, making setups with multiple microphones which have to come on at the same time or go off at the same time simpler to manage. However, this only applies when the output feed can be at a uniform gain irrespective of the input volume gain. This makes it better for use when the group of sources is going to have roughly the same volume and levels throughout.
Busses
Using the same principle, a number of feeds can be represented on a single bus fader which is then sent to the output mix using sends on fader. They vary from groups in that they can output a varying grain mix, so the main output levels for the grouped signals can be different to the output of the bus. This allows for the bus to send a signal to a stage box or other monitor at a different level across the mix compared to the main LR output of the board.
Useful
- Scenes can be saved of the current setup of the board which includes levels and EQ settings. We keep a few scenes in the repository as basics that can start off a new operator at the start of setup. These are just simple level and EQ assumptions for studio and OB setups. 3 are also in for the internal sound system (Control room PC audio system). The presets will bring up both of the edit desks to playout through either the control room, studio or both.
* Feel free to use these scenes and to create more for OBs and shows that are likely to be repeated. Just don't overwrite any of them unless you know they're not being used.
- The Producer (and the Compact for that matter) both have USB slots on the top near the screen which allow for the offloading or re-loading of scenes for the purpose of backup.
- Scenes will keep the bus and groups in them, so any short cuts programmed in will be reflected in the loaded scene.
     * NAME YOUR SCENES
     * Finish your scene before you save and walk away, anything changed after hitting save won't be saved and you'll have to save over the top of it.
* For a large show, like Roses, it is recommended to have multiple copies of the show on USB drives and the board to avoid accidental deletion and alterations. Just don't lose the stick.
- For more information see the user manual here

