UPS: Difference between revisions
From YSTV Documentation Wiki
Tom.cheyney (talk | contribs) (Brackets) |
Tom.cheyney (talk | contribs) (Serial hax) |
||
| Line 35: | Line 35: | ||
==User Manuals== | ==User Manuals== | ||
[http://www.jlab.org/Hall-D/Documents/manuals/APC%20stuff/AP9630%209631%20UPS%20Network%20Management%20Card%202%20User's%20Guide%20firmware%20V5.1.1.pdf Network Card Manual] | [http://www.jlab.org/Hall-D/Documents/manuals/APC%20stuff/AP9630%209631%20UPS%20Network%20Management%20Card%202%20User's%20Guide%20firmware%20V5.1.1.pdf Network Card Manual] | ||
<div style="clear: both"></div> | |||
==Initial Setup== | |||
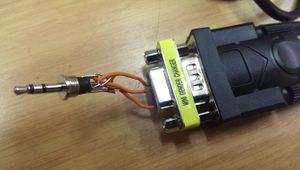
[[File:Serial_hack.jpg|thumb|right|300px|The hack used to interface with derrick]] | |||
To use derrick we first had to gain access to it. The network interface requires a username and password which were set by the previous owner. To reset them we had to interface via serial over a 2.5mm jack (shown right) into the network card. The process is as follows, | |||
* Press reset | |||
* Wait for the network lights to flicker | |||
* Press reset again | |||
* Press enter in terminal until a login prompt appears | |||
* Use login apc, apc | |||
[[Category:Computing]] | [[Category:Computing]] | ||
[[Category:Servers]] | [[Category:Servers]] | ||
Revision as of 22:35, 8 November 2013
The YSTV UPS, affectionately named Derrick by Sam Nicholson was acquired from York Telephony on 6th November 2013 after serving 4 years in the Goodricke Dixon GDI/A South data shed.
| Derrick | ||
|---|---|---|
| Model | APC Smart-UPS RM 1500VA USB & Serial UPS - 980 Watt - Lead Acid | |
| Specs | ||
| Max. Wattage | 980 W | |
| Voltage Compatibility | 220 V / 230 V / 240 V | |
| Max. Voltage-Amps | 1500 VA | |
| Number of Outlets | 4 | |
| Network | ||
| MAC | 00:C0:B7:d5:E3:8D
| |
| IP | 192.168.0.254
| |
User Manuals
Initial Setup
To use derrick we first had to gain access to it. The network interface requires a username and password which were set by the previous owner. To reset them we had to interface via serial over a 2.5mm jack (shown right) into the network card. The process is as follows,
- Press reset
- Wait for the network lights to flicker
- Press reset again
- Press enter in terminal until a login prompt appears
- Use login apc, apc
