HowTo VT Op: Difference between revisions
From YSTV Documentation Wiki
(Created with pre-show guide half done) |
(software screenshot) |
||
| Line 24: | Line 24: | ||
=== Pre-show === | === Pre-show === | ||
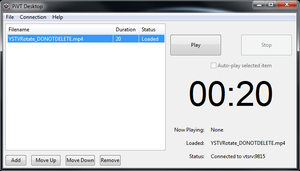
[[File:pivt desktop.png|thumb|The main window of PiVT Desktop. Playlist control buttons towards the bottom, with Play/Stop on the top right. Timer count down to the end of video]] | |||
PiVTDesktop can be started by double-clicking on the shortcut on the desktop. In 'Settings'->'Connection Settings', set server to 'vtsrv.dyn.ystv.york.ac.uk', port to '9815' and click on connect. 'Add' button should then be enabled. | PiVTDesktop can be started by double-clicking on the shortcut on the desktop. In 'Settings'->'Connection Settings', set server to 'vtsrv.dyn.ystv.york.ac.uk', port to '9815' and click on connect. 'Add' button should then be enabled. | ||
Revision as of 17:50, 11 April 2015
Part of the HowTo Live Op series.
The VT Op controls the playout of pre-recorded content (with was originally stored on video tapes) during a live show.
Studio show responsibilities
Pre-show
- Load PiVTDesktop and connect to vtsrv.
- Add all VTs to vtsrv.
- Create/load playlist of VT's to play.
- Check all VTs play as intended.
- Check all VT audio is within required levels.
Show
- Play VTs under direction of the Director.
- Keep Director notified of time remaining on playing VTs.
- Count Director out of VTs.
Post-show
- Remove all VTs from vtsrv.
- Close any software used.
Guide
Pre-show
PiVTDesktop can be started by double-clicking on the shortcut on the desktop. In 'Settings'->'Connection Settings', set server to 'vtsrv.dyn.ystv.york.ac.uk', port to '9815' and click on connect. 'Add' button should then be enabled.
VTs should be stored within the shows folder within Show Resources (normally mounted as R:\) and can be copied to VTSrv using Winscp.
