¶ X2000
The Panasonic HC-X2000 is one of our most used cameras. It's light, the lens doesn't detach and it can produce some nice looking footage.
On top of the camera, there's an included audio rail where you can attach up to two microphones. For reports, typically you'd use a rifle mic, in channel 1, and a handheld mic in channel 2.
Inside the camera bag, there should be a laminated cheat sheet! Use that if you like.
¶ Changing Settings
On the X2000, press the MENU button to alter any settings. Then, either use the touchscreen or the small wheel on the front, directly down and to the left of the SD card slots. Click in the wheel to select, rotate to move.
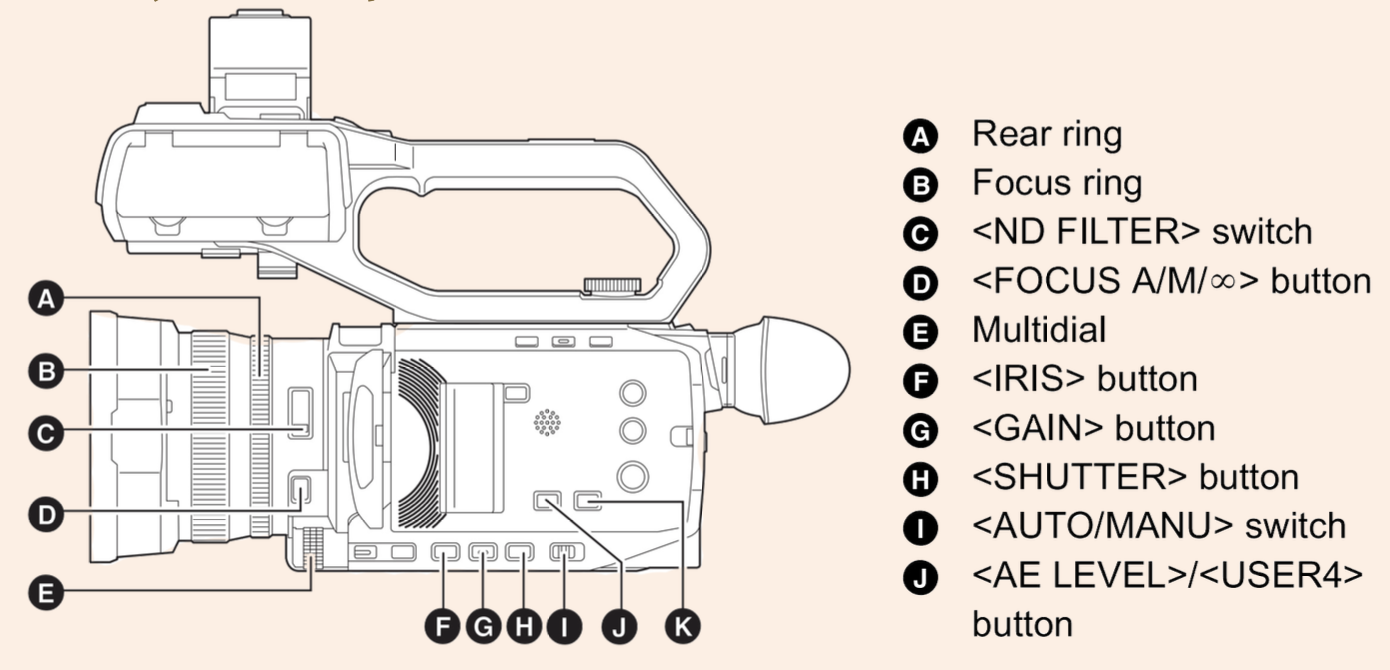
Please refer to the following diagram in the manual for more details.
¶ Before Filming
Ensure the following settings have been set to your or the director/producer's liking:
- The camera is shooting in 1920x1080 FHD (Full High Definition)
- 8 bit colour is selected; using 10 bit won't end the world, but it usually doesn't look different enough to warrant the extra storage space.
- The SD card is inserted and has been formatted (SDHC memory cards will not work with the X2000).
- You're shooting in 25fps (frames per second) and progressive. Unless, you're on a livestream with cameras that can only do interlaced or 50fps and the X2000 must match. 25fps progressive is preferable, your tech lead should tell you if you need anything different.
- You're happy with the sharpness, brightness and colour of the image.
- If you've got access to a plug socket, say for a stream, you can run the camera off mains with the plug included in the bag!
¶ After Filming
- Remove camera from the tripod, keep the baseplate stored on the tripod, not the camera.
- Take the SD card out to ingest, don't lose or scratch it por favor!
- Take batteries out and put them back on charge in studio.
¶ Adjustments to Sharpness, Brightness and Colour
On the X2000, there's an auto and a manual mode. Changing between using the switch, I, means changing all of the settings to manual, not just one. When in automatic, there are some settings the camera won't let you change so you can change to manual as a first port of call for errors like this.
¶ To adjust focus:
- Turn the focus wheel, B, on the end of the lens.
- Put the camera in autofocus if you like! It's the button on the end, D. If that doesn't work, try switching I to manual.
¶ To adjust iris:
- Press the iris button, F
- Twist the multidial, E
¶ To adjust gain:
- Press the gain button, G
- Twist the multidial, E
¶ To adjust shutter speed:
- Press the shutter button, H
- Twist the mutlidial, E
¶ To apply ND filters:
- Press C
- Only do this as a last resort! Perhaps for very bright shoots outdoors.
¶ To change white balance
- Press K to cycle through white balance presets
- If none of them are quite right, press MENU>CAMERA>SW MODE>W.BAL PRESET and select VAR. Then twist the mutlidial, E to adjust.
¶ Adjustments to Technical Settings
These are settings that it's worth looking at. For the majority, they won't change much aesthetically, but they're crucial to getting your footage to work for you.
¶ To set resolution, frame rate and toggle progressive/interlaced
- MENU>SYSTEM>REC FORMAT
- Select option as needed. Typically, 1080x1920 progressive 25 fps, 8 bit.
¶ To set peaking
- MENU>VIDEO OUT/LCD/VF>FOCUS ASSIST>PEAKING LEVEL or PEAKING COLOR
- This will apply peaking to the viewfinder. Peaking is a tool to highlight the edges of objects so you can tell when they're in focus. The colour around the edges does not get baked into the footage.
¶ To set the time
This is a useful feature when there's lots of concurrent cameras. YSTV does not yet have timecode units (Feb 2026), so setting all the cameras to the correct time can help the edit.
- MENU>OTHERS>CLOCK>CLOCK SETTING then set the time and date here.
- Make sure the time isn't getting burnt into the recorded footage. Do this by going MENU>RECORDING>TIME STAMP and turning that off
¶ "Night vision"
The X2000 has an option to shoot... in the dark! This is using IR (infrared).
- MENU>CAMERA>SW MODE>IR REC
- Change the colour if you like, green looks more cliché nightvision though!